- Get link
- X
- Other Apps
Posts
CPDD Blog Project Development

For this blog entry, we are going to talk about: Our chemical device How our team planned, allocated the tasks, and executed the project. Documentation of the entire design and build process our your chemical device In charge of every part of the project Documentation of individual contribution to this project Links to page of teammates’ blog Problems the team faced and how we overcome them 1. Our team Chemical Device The chemical device that we made is the tea maker and its objective is to make tea automatically as tea brewing is a very technical skill and steeping tea has to be done very precisely. This makes it very hard to consistently make the tea and thus making it automatically done will help with the ease the tea making process and the taste. 2. Team Planning, allocation, and execution Our team consists of 4 members: Xavier (me) as the CSO, Nick as the CEO, Kieran as the COO, Anwar as the CFO 3. Design and Build Process Part 1: Design a...
Arduino
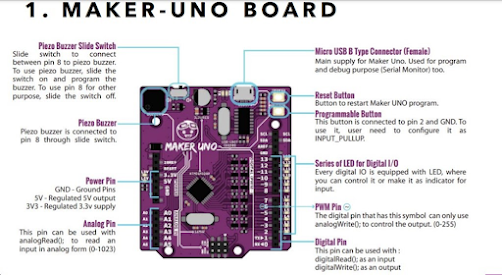
Arduino Programming Introduction to Arduino: So what is Arduino? It is an open-source electronics platform based on easy-to-use hardware and software, used for building electronics projects. Open-source may sound like a foreign word but its meaning is quite simple, all it actually means is that its source code is made freely available for possible modification and redistribution. Maker Uno Kit The maker uno board consists of 10 different parts. It has Piezo Buzzer slide switch Piezo Buzzer Power Pin Analog Pin Micro USB B Type connector Rest Button Programmable Button Series of LED for Digital I/O PWM Pin Digital Pin Figure 1: Components of Maker Uno Board and their functions This is the cable that comes with the Maker-Uno kit and is used to connect the Maker-Uno board to a computer or laptop with Arduino programming installed. Code can then be made with the program and once the code has been uploaded, the USB cable can be plugged in to any power source for it t...
Laser cutting

LASER CUTTING For this week we did laser cutting and the objectives were to: explain how the laser cutter works the risks and hazards that comes with using a laser cutter name the materials that can be cut and how deep it can be cut explain the difference between raster and vector So how does a laser cutter work? Specifically a CO2 laser cutter since that is the one we'll be using. It works by passing high voltage current through the tubes mainly filled with CO2 and some nitrogen which would increase the energy of the gas particles and produce an invisible beam of high power infrared light(laser beam). To move and redirect the laser beam, multiple mirrors would be use to reflect the laser beam to the focusing lens and onto the workpiece. The purpose of the focusing lens is to focus the beam into a small point making it more powerful like a magnifying glass. If the focusing lens is damaged or is too close or far from the focal point, the laser would not be able to cut ...